Creating and Managing Courses
| Site: | Tri-City United Moodle Site |
| Course: | Orientation for Admins - v3.11 |
| Book: | Creating and Managing Courses |
| Printed by: | Guest user |
| Date: | Saturday, September 6, 2025, 7:48 PM |
Description
All links open in a new window.
1. Course Copy
Though Course Copy was introduced to simplify the course import process, we do not recommend using it in its current form, or recommending it to your users. It has several flaws that can prevent it from working properly. For example: Course Copy will not work in courses that have at least one quiz (which may include a large number of your courses). You can follow this issue in the Moodle Tracker: MDL-69941.
It is unfortunately not possible to hide this feature from instructors by updating their role because the roles we'd need to disable would also prevent them from using the Import and Backup/Restore features.
2. Course Creation Considerations
Spending some time making decisions on the initial creation of users, courses and then adding enrollments is an important part of the implementation process. This guide should help you identify necessary information for creating courses.
To get started, think about answers to the following questions:
- Do you plan to provide a new course shell every year/semester?
- Do you need/want to categorize courses by school, department, grade level, term, year, or other designation?
- Do you know the start dates for classes (this defines the date ranges for a Weekly formatted course)?
- How do you want to structure course information naming conventions?
Here are format samples for fullname and shortname:
- Intensified Algebra 1: Blum, Period 1
- P1-MATH:Blum-2022-23
- Foundations of Technology: Harrison, Period 2
- P2-TECH:Harrison-Sem1-2022-23
- Grade 6 Visual Arts; McNeal-Smith
- GR06-ART:McNeal-Smith-2022-23
To batch create a set of courses you will need to create a CSV file. The easiest way to do this is using Excel or another spreadsheet application. You will need columns for: shortname, fullname, category (no spaces in shortname or fullname).
Every site has a Miscellaneous category designated by "1" that can be used if you do not wish to create categories. Categories make organization easier, but they are not necessary. If you want to use categories, we suggest a year or term category structure (ie. 2022-23 for all academic year courses, Training or Professional Development, etc). We also recommend pre-creating your categories before creating your courses.
2.1. Important Notes About The Course Shortname
Unlike the course fullname, the course shortname must be unique in your site. While you can have multiple courses with a fullname of English 110 on your site, you can only have one course with the shortname "English 110". We recommend not including spaces or commas in shortnames to prevent problems with enrollments and some plugins. Many clients will codify and serialize the shortname to prevent duplicates when multiple sections of the same course are offered. For example, if Section A of English 110 begins in August of 2021, and this is the formula for creating course shortnames:
shortname = course name + section number + "–" + two digit semester start month + two digit calendar year
Then applying this formula we create:
shortname = English110A–0821
The course shortname is displayed in the site navigation, including the breadcrumb links within the course, and is used in the subject line of emails sent through the course, or triggered by course activities. The fullname is displayed at the top of each page in the course, and in your users' list of courses.
Do you want teachers to have a new course shell every year?
YES: Append a year and/or term code to the course shortname and/or full name. We recommend setting a start date for the course so the teacher can easily switch between topics and weekly format, and to improve accuracy in reporting. Lastly, we recommend that if you include an end date that you consider what will be most helpful as it relates to the course overview block. Keep in mind that the end date doesn't prevent access to the courses, it just impacts its availability in certain places like the navigation drawer and the Course Overview block on the Dashboard. You cannot set an end date if you're using the weekly format because courses with weekly format will automatically assign an end date based on the course duration set in the course default settings.
NO: You may get requests for this later as teachers want to preserve past course activity for their records.
Do you want the option to bulk enroll users in their courses?
YES: Include a unique Course ID in the settings of the course. This could be the same as the course shortname or something different like a unique number. This is the ID used for flat-file enrollment, and requires a column in the CSV for "idnumber". We recommend not including spaces or commas in the Course ID to prevent problems with enrollments.
NO: No need for a Course ID, but it's easy enough to include one as you're creating courses in the event you change your mind.
Does the category you wish to add courses to already exist?
YES: Identify the category number so it can be used in the file. An easy way to get this number is to navigate to the category page and look at the URL in your browser. It should end in something that looks like: moodle.myschool.edu/course/index.php?categoryid=2 -- use the categoryid number in the spreadsheet.
NO: Add the category first then come back to this question to answer Yes, and locate the categoryid number using the directions above.
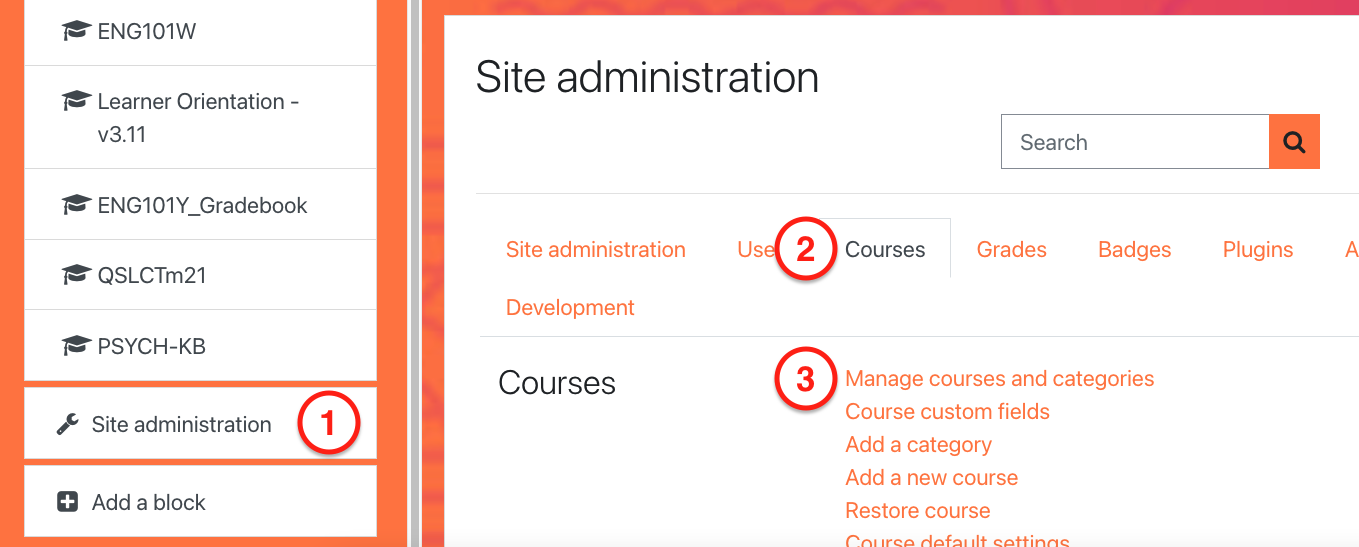
3. Manual Course Creation
To create a course site manually, first navigate to the category where you would like to add this course. From Site Administration, click the Courses tab, then select "Manage Courses and Categories."
On the next page, click the name of the category or subcategory where you'd like to add the course. When the page reloads, click the “Create a New Course” button.

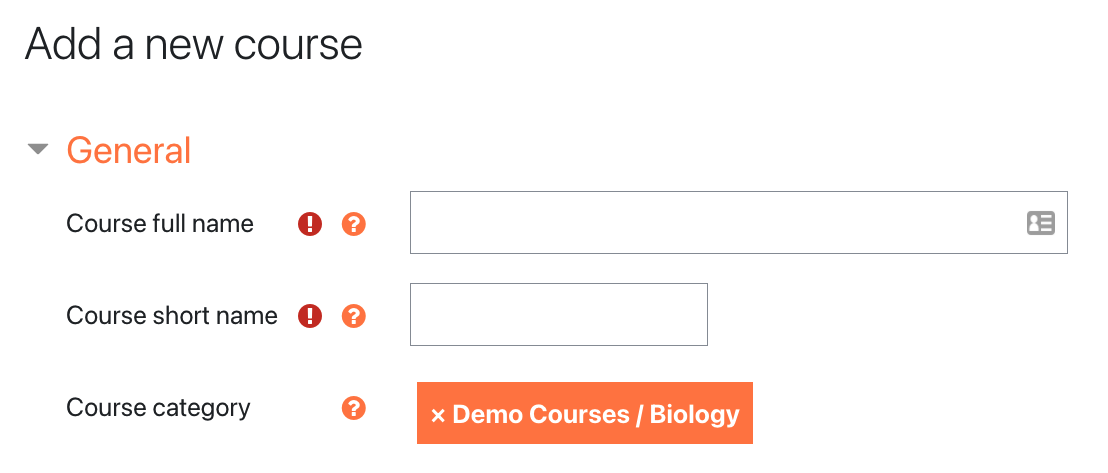
On the next screen, you will assign a Full Name and Short Name for the course. The Full Name is typically longer and more descriptive, and the short name can be some abbreviation of the full name if desired. The convention used to name manual courses is entirely up to you, but we recommend developing some sort of standard to make it easier to locate these courses later on.
The next setting, course visibility, is set to your site default. If you want it to prevent enrolled learners from accessing the course right away you should ensure this is set to "hide". Configure remaining settings based on the needs of the instructor who requested the course.
When you've finished configuring your settings, click the “Save and display” button at the bottom of the page. You'll be redirected to the Participants page in the course where you can manually enroll instructors and learners, or add another enrollment method. Please see the Enrollment Options Book in this course for more information on how to enroll users into your courses.
4. Bulk Creating Courses via CSV
Creating courses using the flat-file method requires a .CSV file with very specific formatting to complete the upload.
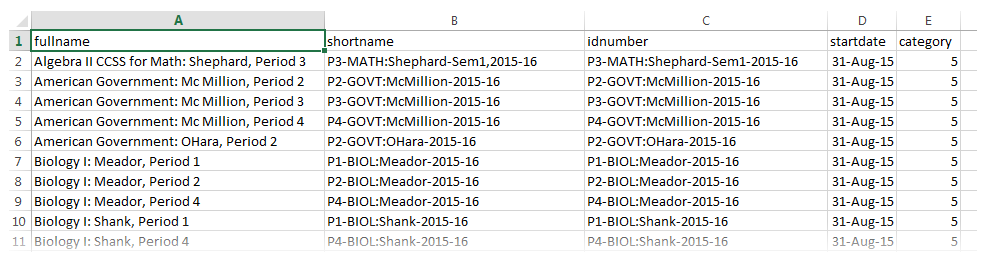
The file used for uploading courses should be a text file saved as a .csv with a single record per line. The first record (row 1) contains a list of fieldnames defining the format of the rest of the file.
Required Fields
- shortname - course shortname
- fullname - course fullname
- category - must be category id numbers from Moodle (not the Descriptive titles). For help locating the category id number, view the video below.
Additional, Optional Fields
- idnumber - course ID usually used by your SIS/ERP to help match enrollments to the course
- visible - 1 if the course is visible, 0 for hidden
- startdate - this value is passed to the PHP function strtotime to generate a timestamp so include a human readable startdate such as: 26 Sept 2015
- summary - text to include as course summary
- format - must be a valid course format plugin name such as weeks, topics
- delete - to delete a course (will match shortnames) include 1 to delete, leave blank to update or create
The list of courses provided from your enrollment manager may have all the information needed, but not in the required format. If you need help with getting your data in the right format, take a look at the tutorial on manipulating data with Excel.
Important Note: CSV files must be opened with notepad or renamed as .txt and then opened in Excel to assure any leading zeros on user idnumbers and courseIDs are retained.
Uploading the CSV file
Once the CSV file is in the correct format with the appropriate information included, go to: Site Administration > Courses > Upload Courses. You will be able to upload the CSV file, make any changes to defaults, and receive an immediate confirmation for the course creation.
5. eThink's SIS Integration
eThink Education manages your site's integration with your institution’s Student Information System (SIS). This allows for the creation of courses and the enrollment of teachers and students to occur automatically.
When a course is created or cancelled within your SIS, the change will be reflected in your site. The same is true when instructors are reassigned, or learners add, drop, or withdraw from a course. These changes are not always immediate, and are typically triggered by one of two events: Login sync (if enabled), or a nightly task (the default configuration for sites using our integration).
- Login Sync: As soon as a user logs in to your site, their enrollment will be automatically updated. If the user has enrolled in a course that does not yet exist on your site, logging in will trigger the creation of the course, then the user's enrollment in the course.
- Nightly Task: Most sites using our integration are configured to run a complete synchronization between your SIS and your site each night, typically between 1:00am and 3:00am. There are separate tasks for creating courses and enrolling users. The task to enroll users runs later than the task to create courses since users can't be enrolled in courses that don't exist yet.
At the start of a term when courses and enrollments are still fluctuating, you can use the Login As functionality to trigger these updates rather than waiting for the nightly sync in order to troubleshoot issues related to accessing courses. You can also submit a support request to set the task to run more frequently. Running these tasks more frequently does come with the risk of longer site load times, which is why they are scheduled to run overnight when fewer users are active on your site.
For more information about eThink's customized enrollment integration, please consult our Knowledge Base (opens in new window), About eThink's Enrollment Integration.