Tips For Editing Existing Course Material
| Site: | Tri-City United Moodle Site |
| Course: | Advanced Usage of Moodle™ - v3.11 |
| Book: | Tips For Editing Existing Course Material |
| Printed by: | Guest user |
| Date: | Sunday, September 7, 2025, 3:18 PM |
Description
This book explores features you may have overlooked while building or managing your course content.
1. Editing Icons
You'll likely spend more time managing your course content and activities than you will creating them. Each new course brings maintenance requirements with it, including revising existing course content, updating requirements for activities (such as due dates for Assignments or open/close dates for Quizzes, and incorporating new features to enhance your course.
Familiarizing yourself with the editing interface for course content is a great launching point for the other features in this book. For now, let's focus on the editing features available on your course home page when editing is turned on.
Course Editing Icons
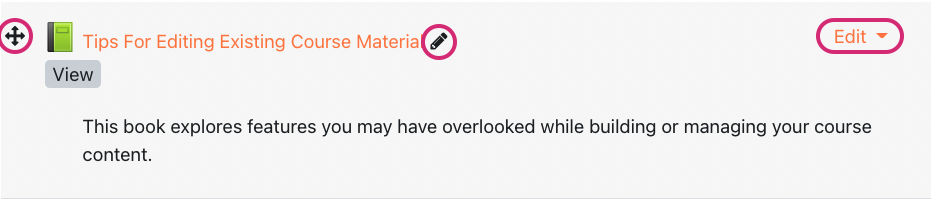
There are three editing features for course resources, activities, and topics:
- Move resource (crossed arrows)
- Edit title (pencil)
- Edit menu
Move Resource (crossed arrows)
The Move Resource feature is for rearranging content in your course. You can use it in one of two ways:
- Click, hold, and drag your content to a new spot. This is similar to how you would move a file to a folder on your computer.
- While dragging, you'll see a faint "ghost" version of your content. This indicates where the content will be replaced when you release the mouse button you're holding down.
- Click the icon once to select its new location from a menu (the content you're moving will go above the content you select in this menu).
-
- This option is best used when you're moving your content a significant distance in your course (e.g. the bottom of the page to the top).
- It can sometimes feel overwhelming if you're moving content since the menu that appears will display all content in your course.

Edit Title (pencil)
Clicking this icon will open a text field that allows you to rename that content or topic without having to open its settings. Remember to hit the Enter key when you're done updating the name, or your changes won't save!
Edit Menu
 The Edit menu is a quick way to make (or access) quick edits for course content. These include:
- Accessing the content-specific settings for that activity or resource
- Indenting the content left or right (this is a nice way to make content more skimmable on your course home page)
- Quickly hide that content from learners (this setting overrides any Restrict Access or activity settings related to the content's visibility)
- Duplicate the content (some instructors use duplicate on an Assignment or Quiz that's configured with their preferred settings, then they just update the due date and prompt(s))
- Assign specific roles to specific users just within that activity (this is highly dependent on the permissions assigned to your instructor role, and roles that exist on your site at the activity level)
- Delete the content (you will be prompted to confirm you want to do this, and as mentioned in Using the Recycle Bin, your content will move to the course Recycle Bin for 7 days before it's permanently deleted.
Note: The Editing menu for course topics is slightly different, but still includes options to edit, hide, or delete the topic. Some course formats have an additional option to highlight a topic, which will provide a visual indication to learners that it's the current topic.
2. Restricting Access
The Value of Restrict Access
If you're looking for more granular control over the visibility of course content and topics that goes beyond a simple hide or show, Restrict Access offers additional conditions for when content is (or isn't) available to learners.
Though some activities like Quiz have their own availability features (open and close dates), all activities, resources, and topics have Restrict Access available as an optional setting. Restrict Access allows you to set a condition or conditions for when something is made available to learners in your course. For example, you can use Restrict Access to:
- Make an entire topic visible once a certain date and time is reached
- Keep content hidden until another activity is marked as complete (some instructors use Restrict Access to hide their first topic until the Syllabus is marked complete)
- Set content to only be visible to learners if they've been added to a specific group
- Set content to only be visible if learners complete an assessment with a specific grade
Setting Restrict Access
This feature is found on the Edit Settings page of your activity, resource, or topic. Content can be restricted using a broad array of conditions, and conditions can run in parallel or be combined. For example:
- Parallel Restrictions: If you wanted to allow stronger learners to work ahead, you can set a topic to become available on a certain date, OR if the learner completes an assessment in the previous section with a passing grade.
- Combined Restrictions: If you wanted to restrict the flow of the course so learners cannot progress until they can demonstrate mastery of a previous section, you can set a topic to become available on a certain date, AND when the learner completes an assessment in the previous section with a passing grade.
Options for Restricting Access
Restrict Access offers the following conditions for content visibility. You can add multiple conditions, and require learners to meet all or any of them:
- Activity Completion: This can be a specific activity in the course, or the previous activity.
- If you do not see the activity you would like to require completion for, it likely does not have completion conditions set for it yet. Edit that content and set its activity completion requirements.
- If your course regularly goes through major revisions, setting this to "previous activity" will always require that the most recent activity or resource with activity completion requirements above it be completed before the content is made available.
- Date and Time: Bear in mind this can be used to enforce when content becomes available, or remains available. This can be useful for controlling progress through a course, or automatically hiding content after a certain point.
- Grade: This includes grades for individual activities, or the course total.
- Group: This option will only appear if you have created at least one group on the Participants page of the course.
- User Profile: This works especially well if you want users with specific profile field entries to see specific content. Some academic advisors use this feature to make support resources available to student athletes. Some corporate clients use this to make specific resources available to learners with a specific job position in the company.
- Restriction Set: This is the most complicated option available. Restriction Set allows you to create a combination of the settings listed above. This is most useful in situations where you have a complex set of requirements.
- As an example, if you have two groups of learners in the course who have to meet different requirements to view course content, Restriction Set would be a good option.

Special Note
Restrict Access settings will override any activity level settings. For example: If you configure a Quiz's open date to be Monday at 10am, but have Restrict Access settings configured to not make the Quiz available until Tuesday at 10am, the learners will not see the Quiz until the Restrict Access settings release it on Tuesday morning.
Additional Notes
How Unavailable Content is Displayed
If an activity or resource is restricted from learner view before a certain date, it will either be completely invisible to the learner, or its link will be grayed out with details regarding the conditions set on its availability. You can change how this displays in your course settings (Course Format > Hidden Sections). Even if learners do see the grayed out link, they cannot see the activity until it's made available.
Consequences of Hiding Graded Activities
If an activity (such as an assignment, forum, or quiz) is set to be available until a certain date, once that date has passed the activity will disappear entirely from learner view. This means that learners will be unable to view assessment feedback they've received, and their grade will likely be hidden from them in the gradebook.
Conflicts with Quizzes
If you have entered a User Override or Group Override for users in a Quiz, Restrict Access will override those settings. This could accidentally prevent learners from accessing the Quiz.
3. Download Course Content
The (opens in new window) download course content feature allows instructors to optionally make course content available for learners to download as a packaged zip file. This download does not include functional course activities, but will include content from the File, Folder, Page, and Label resources. This feature can be especially helpful for learners with low or limited broadband access.
Special Notes
If enabled in a course, students will see a button to download course content in the top-right corner of the course.
This feature must be enabled at the site level for it to become available to users with the teacher/instructor role. If it has been enabled on your site, you can enable enable it on a course-by-course basis in the course settings area. If you do not enable it, the students will not see this feature.
If you embed streaming video content from a service like Instilled, Kaltura, Panopto, or YouTube, these cannot be downloaded as part of the zip file. They will appear as an embedded video if the learner has an active internet connection while they review it, but if they are fully offline they will not be able to view streaming videos.
4. Record Audio & Video
If you're taking a more DIY approach to course media, you can create brief audio or video recordings through the text editor. Though it's a very simple interface for recording short bits of audio or video, it's important to note several limitations of this feature.
- Short recording times. Though this can be an advantage if you're recording a brief introduction to a section or topic, or a forum post, the default recording length of two minutes isn't enough for more in-depth course content.
- Limited recording sources. The video feature only records from your device's webcam, which means it cannot be used to create or upload screencasts.
- Inaccessible. Neither recording method includes a captioning or transcription feature. We recommend including a separate transcript of your recording in the text below your recording.
- No mobile support. As easy as this feature is to use, it's unfortunately not supported on mobile devices. Neither you nor your learners will be able to create a recording, or view a recording, on a mobile phone or tablet.
Despite these limitations, this feature is a great and easy way to add more presence to your course.
Atto Recording
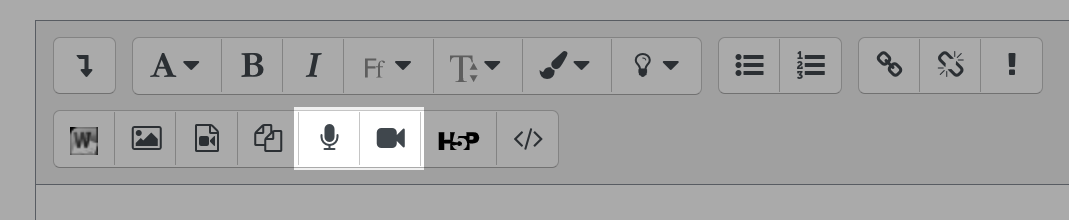
Anywhere you see your Atto text editor you can use this feature. If you don't know what the Atto text editor is, it's whenever icons are displayed above the text box.
The record audio button is a microphone, and the record video icon is a camera.
Click either record button. A box will appear and prompt you to begin recording. The first time you use either feature you will likely have to allow your browser to access your computer's microphone and/or webcam.
When you begin recording a two minute countdown will be displayed over the recording button. Stop the recording when you're done (otherwise it automatically stops when it reaches the two minute limit). You can listen to or watch the recording before saving.
This feature is a great way to incorporate media into your courses, and to personalize the delivery of your material.
Examples for Use
These simple recording options can be used in several different contexts, including:
- Creating a topic or weekly introduction for your learners.
- Providing extra description for an Assignment prompt.
- Providing a summary of how the learners collectively did on a summative assessment.
- Providing more personalized feedback on Assignment submissions of Forum posts.