Advanced Features for Users
| Site: | Tri-City United Moodle Site |
| Course: | Orientation for Admins - v3.11 |
| Book: | Advanced Features for Users |
| Printed by: | Guest user |
| Date: | Saturday, July 19, 2025, 6:03 PM |
1. Download Course Content
The download course content feature allows administrators and instructors to make course content available for students to download as a packaged zip file.
Please submit a support request to enable this feature on your site. This feature must be enabled at the site level for it to become available to users with the teacher role. If enabled on your site, instructors can enable enable it for their course in the course settings area.
If enabled in a course, learners will have a button to download course content in the top-right corner of the course. If your site is using the Boost theme, instructors will have a new menu option when they click the gear icon in the top-right corner of the course.
More information on the download course content feature can be found in the video below.
https://youtu.be/Dsef2LcmTN0
2. Safe Exam Browser
Safe Exam Browser (SEB) is an open source test proctoring solution integrated into the Quiz activity. If enabled, SEB can prevent learners from accessing external apps or resources on their device while attempting a Quiz. SEB is a customized web browser that is compatible with Windows, macOS and iOS. This application must be downloaded and installed on learner devices in order to take a Quiz where it's been enabled.
Key Features of SEB
- Students will only be able to attempt the quiz if they are using SEB.
- The browser window won't have a URL or search field, and back/forward navigation and reload can be disabled.
- SEB cannot be closed until the test is submitted.
- Switching to other applications is disabled by default, but it's possible to allow the use of specific third party applications during an exam.
- Shortcut keys such as Win+Tab, Alt+Tab, Ctrl+Alt+Del, Alt+F4, Print Screen, Cmd+Tab are disabled, and cannot be used to close SEB or to switch to other user accounts on the computer. The ability to take screenshots/print screen is also disabled.
- The clipboard is cleared when starting and quitting SEB.
- The browser context menu is disabled.
- Specific web sites/pages/resources can be configured to be accessible during an exam, using a URL filter.
- Spell checking and dictionary lookup is disabled, but can optionally be enabled.
Site administrators can create SEB templates at the site level to accommodate a variety of testing situation needs. These templates can help to make the process of using SEB quicker and easier for instructors, and can improve consistency between quizzes. Please open a support request if you'd like to update these settings.
More information about configuring and using SEB is available in the Safe Exam Browser article and the video below. Detailed information about Safe Exam Browser can be found at the Safe Exam Browser Website
https://youtu.be/ytztYguXixk
3. Importing Course Content
Course Import
The Course Import feature allows administrators and instructors to copy content that was created in previous courses. This saves instructors a significant amount of development time. Instructors can import specific resources and activities from a previous course, or all the content.
The Import process does not include any user data, including prior enrollments, groups and group memberships, assignment submissions, quiz attempts, forum posts, and learner grades. This also includes forum posts made by the instructor(s), and emails sent through the Quickmail block.
Imports will copy content from the source course into the same spot in the destination course. For example: if you import resources that were located in Topic 7 of the source course, they will appear in Topic 7 of the destination course.
Important Notes:
- The
availability settings that were set in the source course will remain the same in the destination course. If a
resource within a topic is hidden from students in the source course, it will remain hidden in the destination course.
- Due dates
on activities will need to be updated for the current term. Any time and date-based settings you set on activities in the source course will typically remain the same in the destination course.
- Some clients use the Dates plugin to bulk edit dates for course activities. If you'd like to add this plugin to your site, open a support request and ask for report_editdates to be installed.
To import content:
- Navigate to destination course (the course you're importing content into)
- The next step is dependent on your site them.
- In Boost, click the gear icon in the top-right corner of the course, then select "Import" from the menu.
- In Fordson, open the Course Management Panel and select "Import" near the bottom of the Course Settings column.
- Search for the source course on the next page.
- Tip: If you're having trouble finding the destination course via search, try simplifying your search terms.
- Select the course, then click the Continue button.
- In the first step you will choose what to include or exclude in the import. For example, you may want to copy the activities, but not the course blocks.
- In the second step you will select the specific activities and resources to import. All content is selected by default, and can optionally be de-selected.
- The final step is a review to confirm the selections you made in the second step.
- Begin the Import process with the ‘Perform Import’ button.
Important Notes
- Imports can take anywhere from several seconds to several minutes to process.
- Imports create a session lock for the user who initiates them. This means you will not be able to perform any other action on your site (even loading another page) while the import is processing. This is a security feature to prevent your site from being overwhelmed by demanding task requests.
- If a course is especially large, or has a very large question bank (5,000+ questions), the import process may take longer than your browser can wait. This will result in a 504 error in your browser. This does not mean the import failed. It just means your browser could not wait any longer for it to finish. Try loading another page on your site. If it does not load, temporarily log into your site in another browser. If it does load, the import process is done.
4. Stealth Activities
Stealth Activities
"Stealth Mode" is the nickname for a setting that makes content available to learners while hiding it from them on the course home page. Learners can still access the content if they are provided with a link to it. Some instructors use stealth mode to reduce the amount of content visible to learners on the course home page, then include links to content in a centralized location like a Page resource.
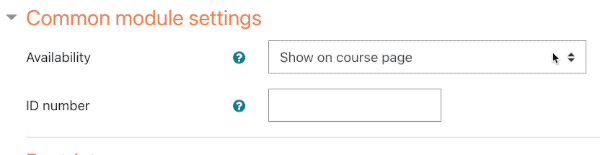
Putting Content in "Stealth Mode"
While editing the settings of course content, click the Common Module Settings heading to expand its options. Set Availability to "Make available but not shown on course page", then click the Save button at the bottom of the page.
If you still want learners to access an activity or resource in stealth mode you will need to provide them with the link. Some instructors will use the Page resource to create a centralized overview of a week, topic, or module, including links to the activities and resources in stealth mode. Another option is to enabled the "Activity names auto-linking" filter at the course level. With this filter on, the instructor can type the exact name of an activity or resource and it will automatically turn into a link to that content.
Important Note
If you place a graded activity in stealth mode (including Assignments, Quizzes, and Forums), learners can still access these activities by clicking links to them in their User Report (where they view their grades).
5. H5P Interactive Content
H5P is a tool for creating interactive course content, including interactive videos, quizzes and presentations. Though H5P is available as a standalone plugin, it is also built directly into your site through the Content Bank (if enabled). There are three ways to add H5P into a course.
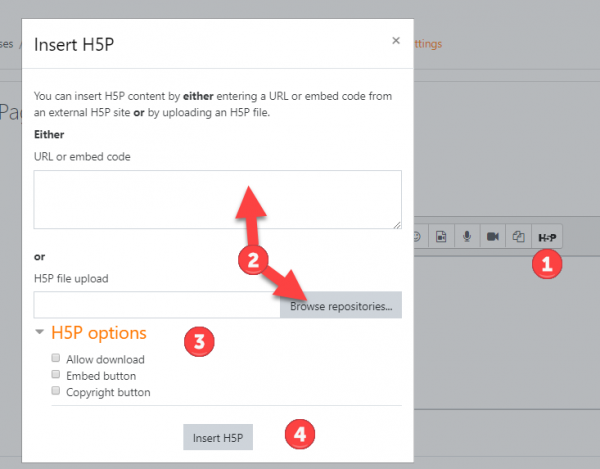
The first way is to use the H5P button in your text editor to either enter a URL or an embed code from an external H5P site, or to upload a H5P file.
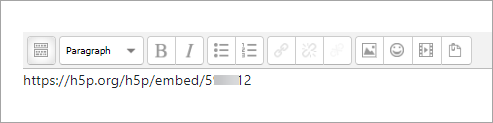
The second way, if you have the H5P filter enabled, is to simply paste the URL to your content into your text editor. This filter will convert URLs into H5P interactive content.
The third is to use the Content Bank to create H5P in a repository within a course, then deploy the H5P activities into your course sections.
https://www.youtube.com/watch?v=p7ihJZgZQ4M
Please contact the support team if you'd like to know more about your options with H5P!