Tracking User Progress
| Site: | Tri-City United Moodle Site |
| Course: | Orientation for Admins - v3.11 |
| Book: | Tracking User Progress |
| Printed by: | Guest user |
| Date: | Saturday, September 6, 2025, 7:30 PM |
Activity Completion
Activity completion allows the instructor to set criteria learners must meet in an activity or resource for it to be marked complete. These conditions might be viewing, receiving a grade or a student marking an item as complete manually. Though a user's activity completion status was displayed as a checkbox in previous versions of your site, completion criteria and status is now displayed as a series of labels. For more information and examples, please review the New to You in Our Latest Update! Book in this course.
We recommend enabling activity completion settings on all resources and activities. This will add more value to the activity completion and course participation reports that instructors can use to monitor learner progress in the course.
Completion tracking must be enabled in the course settings first. In the course settings, scroll to the Completion Tracking heading, then set "Enable completion tracking" to "Yes".
![]()
Once enabled there, the activity completion settings will appear alongside the other settings for any resource or activity you add to your course. They're usually located just above the "save and display/return to course" buttons.
Examples of Completion Tracking
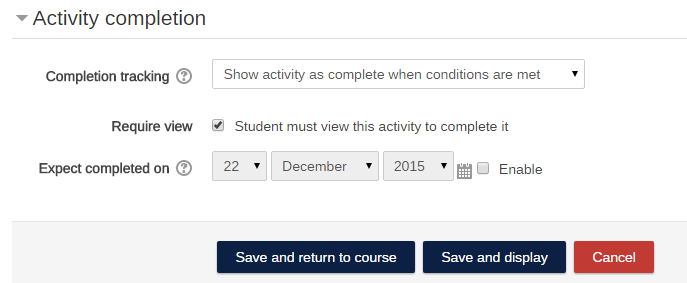
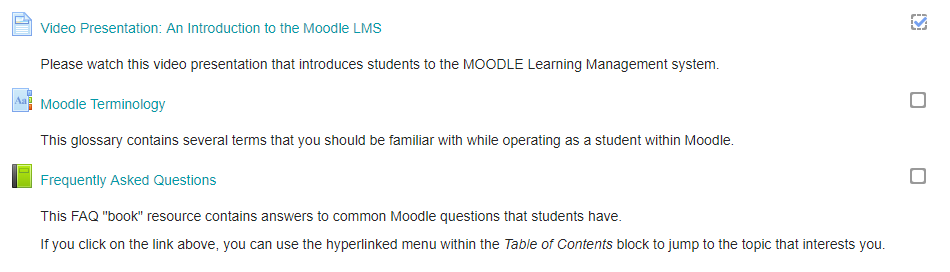
Resources: Require view
For resources, you can require learners to view the content (like a File, Page, or URL) before it's marked as complete.
Note that if a course uses Folders, you will only be tracking views of the folder at the top level and cannot tell through completion tracking or course logs if the individual files within the folder have been accessed by learners.
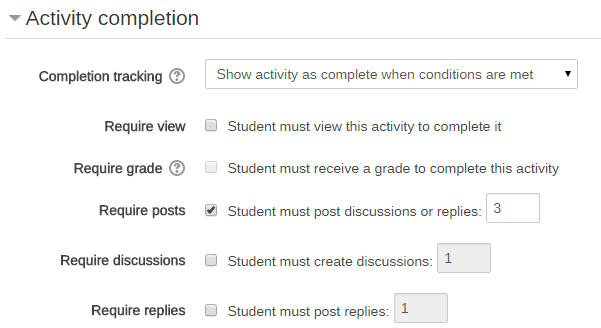
Forums: Require 3 discussions or replies
It's not uncommon in online or hybrid courses to require students to participate in discussion forums. Activity completion can be configured to require learners meet specific participation thresholds. For example, a Forum can be configured to be marked as complete only after the learner creates one original post in response to the question(s) posed by the instructor, as well as at least two replies to replies posted by their peers.
To monitor whether or not students meet this requirement, you can set the require posts to 3. Though you can individually specify how many replies and posts, using "Require posts" instead ensures these settings will apply no matter what forum type you use.
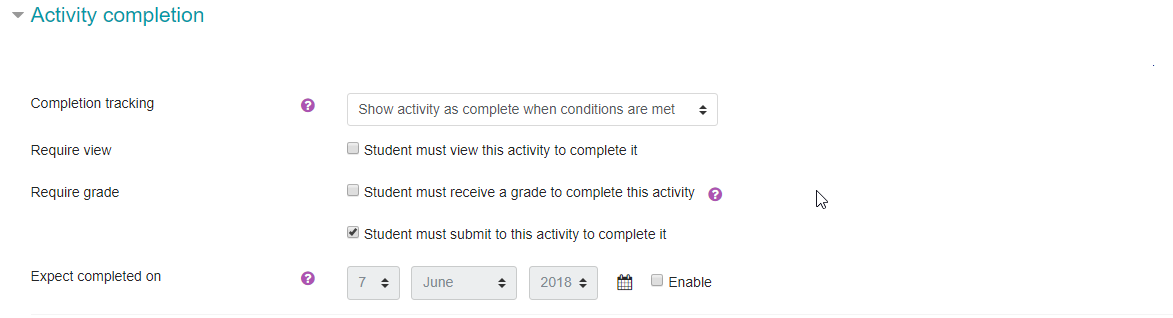
Assignments
Assignments can be marked as complete by any combination of the learner viewing, creating a submission, or receiving a grade. Most instructors consider submission of the assignment the condition completion, but require grade will prevent the assignment from being marked complete until after it is graded.
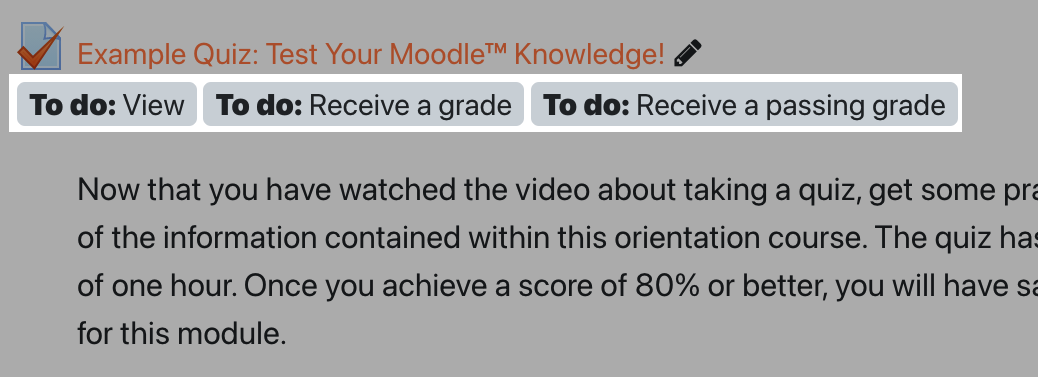
Quizzes
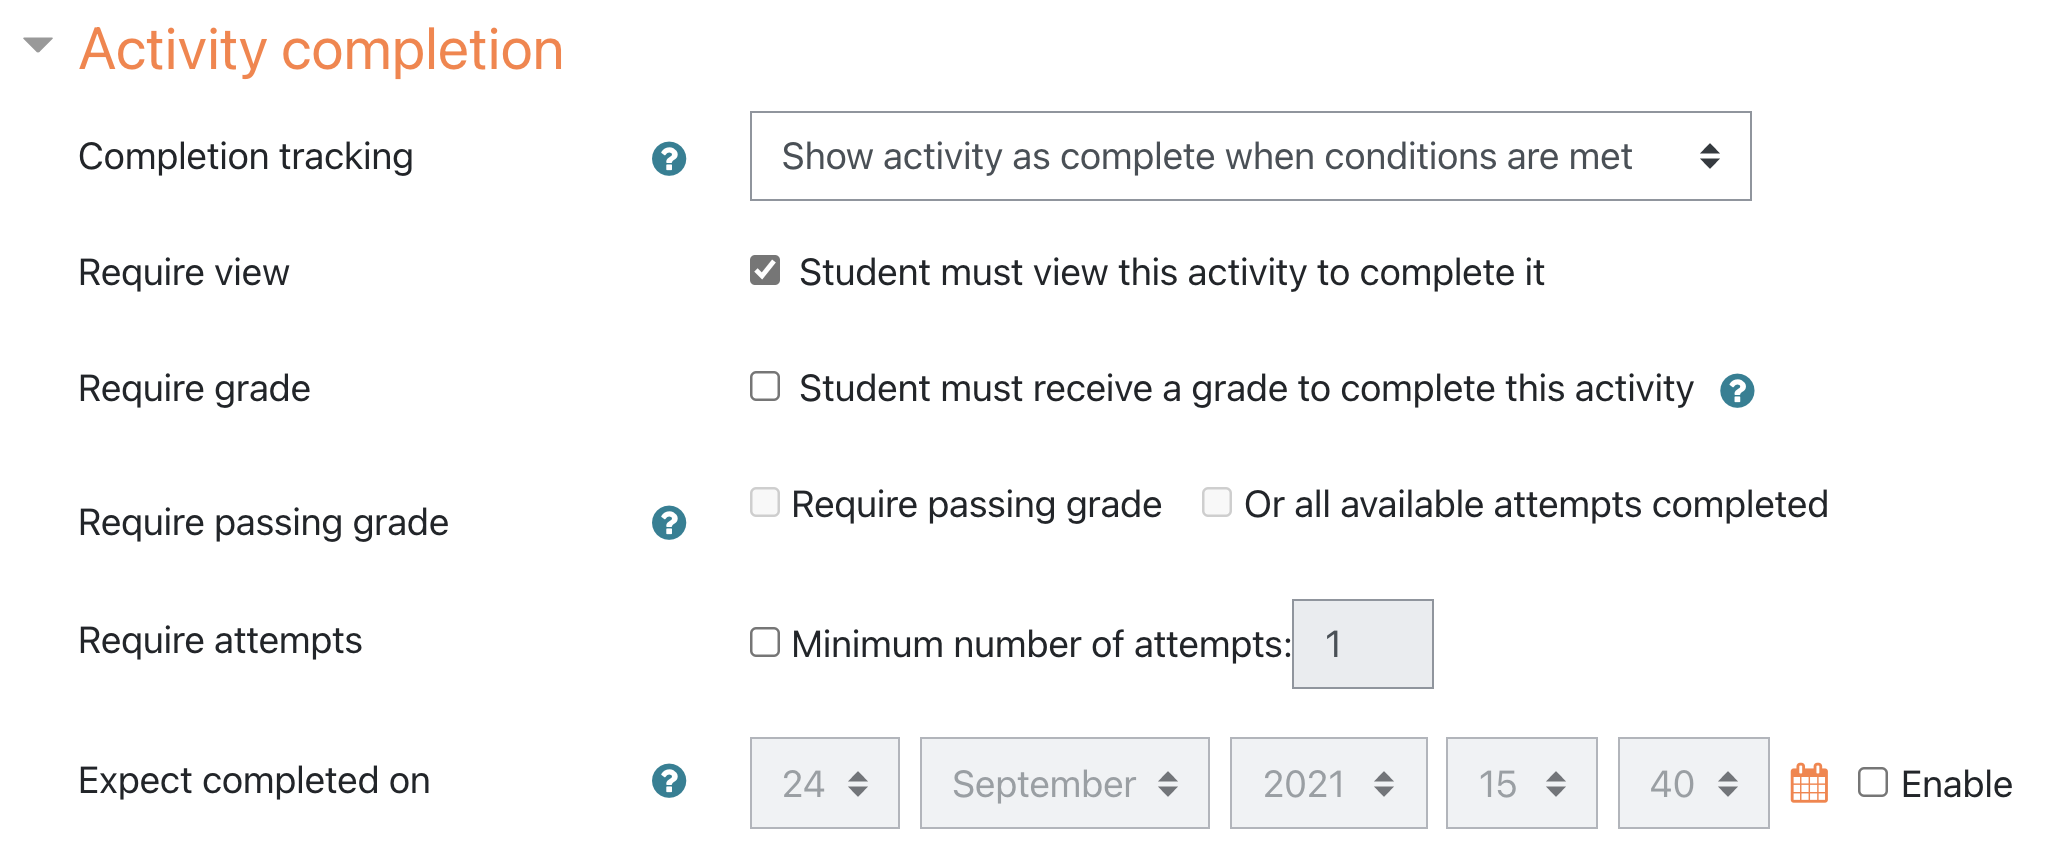
Quizzes can be marked complete with any combination of several options:
- Viewing the Quiz
- Receiving a grade (selecting this criteria also enables the next two options)
- Receiving a passing grade
- Completing all available attempts
- Completing a minimum number of attempts (if multiple attempts are allowed)
If all of the questions within the Quiz are automatically graded, then it will be marked complete once the learner submits their attempt (assuming they meet any additional grading requirements you may have set). If there are essay questions that require manual grading, the Quiz must be graded before the activity will display as completed to the learner.
Student View
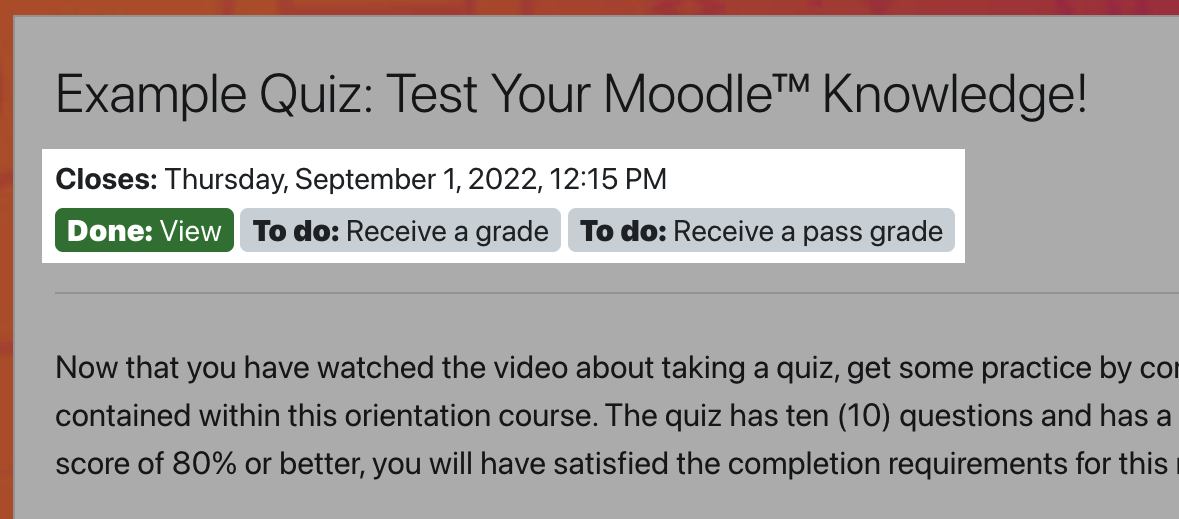
Prior to upgrading to 3.11, activity completion was displayed on the right side of the course page as a single checkbox.
Beginning with 3.11, activity completion is now displayed as a series of labels. One label will display for each criterion set for the activity or resource, so some course content may have several labels.
Though the labels use more space than the checkboxes, they more clearly communicate expectations to learners. Labels are clearly marked as done when completion criteria has been met.
Reports
The location of course reports depends on the theme your site is using. In Boost, click the gear icon in the top-right corner of the course home page, then select "More" at the bottom of the menu. In Fordson, open the Course Management Panel and look under the User Links heading (the fourth column).
The Activity Report provides a summary view of all of the course's resources and activities, and how frequently those resources and activities are being accessed by course participants. Next to each item you will see the total number of views, as well as the timestamp of when it was last accessed.
The Course Participation Report provides a more refined look at your course's activities, and how your students are interacting with them. You can choose from the following options when refining your search: Specific Activity, Days to Look Back, Role to Show, and Actions to Show. The definition of View and Post for the selected activity type will be given on screen. This will tell you who has not completed a particular action according to the parameters you set, and allows you to send the learner a message to remind them that it is still incomplete.
The Activity Completion Report is an invaluable tool for instructors to quickly assess how learners are progressing through the course. Instructors can override completion for individual users through this report by clicking the checkbox that aligns with the learner and the activity. Instructors will be prompted to confirm they want to override the completion for that activity. Overridden activity completion appears as a red check mark.
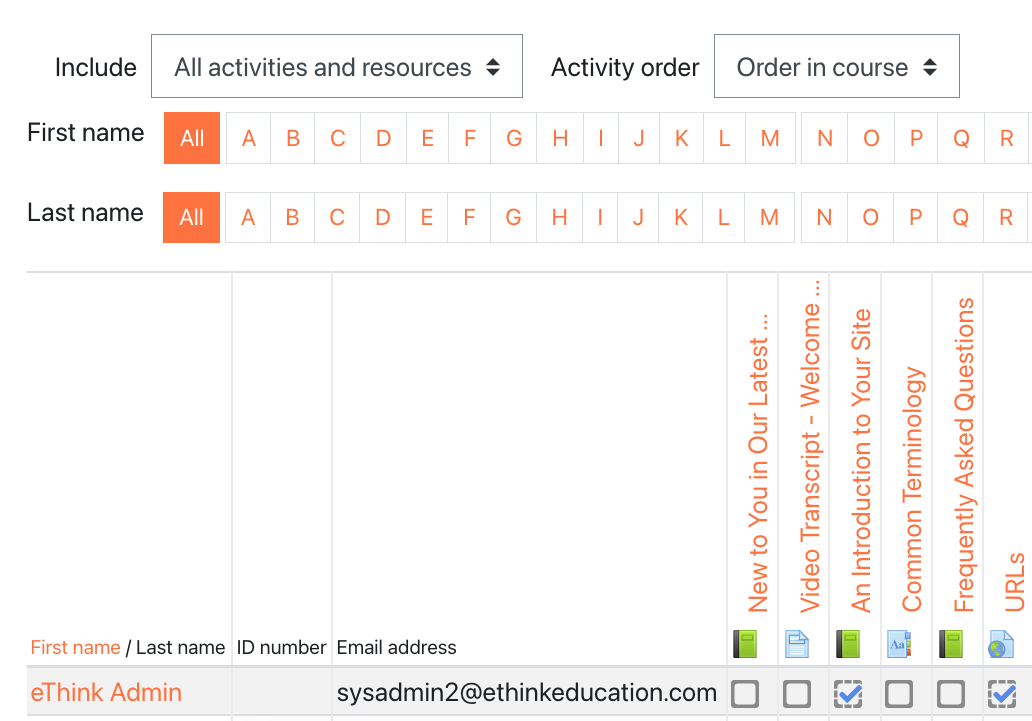
Instructors can also filter the report to show specific types of activities or resources (e.g. just the course Assignments), and has an option to sort the activities by their order in the course, or alphabetically by name.
Competencies
Competencies are very personal to each of our clients. We recommend working with your onboarding team if you're interested in integrating these into your site. Please open up a support request if you'd like to use competencies, but have already transitioned to support.
If you’d like to begin working with competencies on your own, the following information will help you get started.
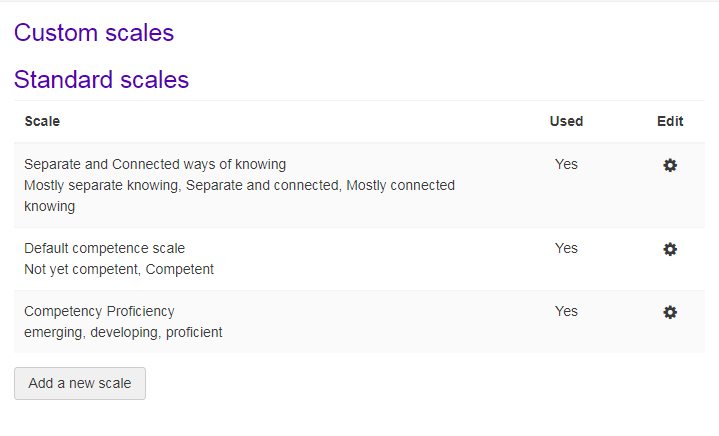
We suggest you begin by creating a personalized scale within your system, unless you want to use the default scale.
To create a Scale go to Site Admin > Grades > Scales
Samples:
- 12th Grade English Scale: Foundational, Basic, Proficient, Advanced
- Competency Proficiency: emerging, developing, proficient
To create a competency framework, go to Site Admin > Competencies > Competency Frameworks > Add a new framework.
When building a framework, you assign a name, ID number (some shorthand version of the name), offer a description, assign your scale, and then dictate the taxonomy.
Scales
Configuring Scales: Scales will be used when the completion of an activity is tied to a competency. For example: If a quiz with a certain score is tied to a competency and automatically completes it. You need to configure the proficiency scale there to indicate that completing a quiz with a passing score of 80% or higher = proficient, equals developing, etc. Options are based upon your specific scale.

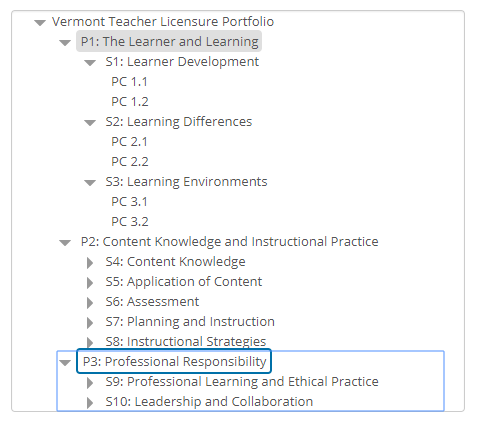
Choosing a Taxonomy
In the Taxonomy menu, select the words used to describe various aspects in the framework. These terms are interchangeable and can be selected based on what fits your definition of "best". You may consider that behavior is appropriate for demonstrated action of mastery, or that concept is appropriate for theoretical evidence of mastery, etc. These terms are outlined only within the framework and do not appear in the user view, so we advise you to not overthink these selections.
Think of the framework like an umbrella. The framework is the overarching area that all your individual competency requests will fall under.
As you build out your competency framework you'll have the option to include an ID number. The ID number is especially helpful if you choose to report on competencies down the road. The ID number does not have to be a number. Take some time to consider what type of phrasing here is most relevant for your institution, your curriculum guides, and / or your competency requirements.
Linking Competencies
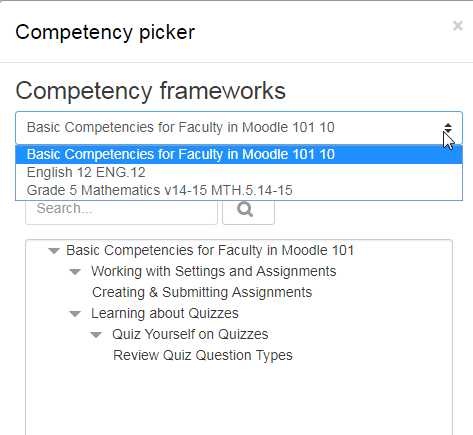
Once you've created your competency framework at the system level, you’ll need to then link them to a course or a set of courses. To begin, access the course you’d like to link to the competency framework you’ve created. Click the link to Competencies in the navigation drawer.

Use the "Add competencies to course" menu to select the appropriate competency.
TIP: In order to quickly select all steps within the competency you can hold your Control or Shift key and click once on each item. When done, select Add.
While this process may seem tedious, it allows you to pick and choose the skills you want to include for each course competency.
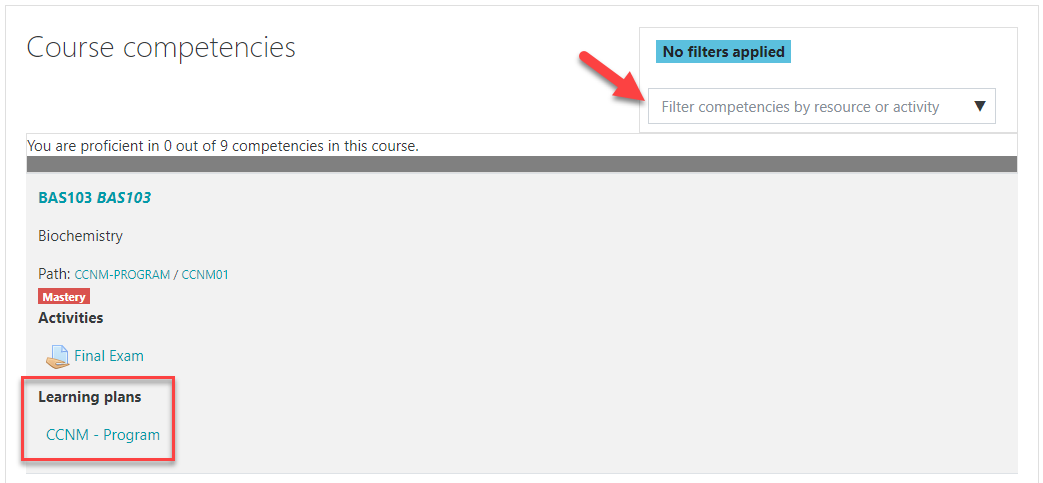
After adding in your selected items you’ll be taken to a page that displays all linked competencies. You now need to map activities and/or resources in the course to these competency steps. These can be attached as evidence, immediately complete the competency, or be sent for review by an instructor.
You can filter the competencies displayed at the course level by associated activity. You can also filter to learning plans associated with each competency linked to your course.
Learning Plans
Learning plans are the learner-facing side of competencies. They can be created as templates, and then assigned to learners across your site. This approach is better than creating individual learning plans for many learners, and means you only need update the template for the changes to appear for all learners.
Add a new learning plan by going to Site Admin > Learning Plan Templates > Add new learning plan
Give it a relevant name and a description (if desired). Descriptions are helpful for admins reviewing a learning plan before assigning to a user. Due dates are optional. Note that learning plans are tied to the system level.
Once saved you’ll have the option to link competencies to the learning plan. This allows you to personalize a learning plan for different types of learners – students can have competencies that apply specifically to their situation and needs.
To add competencies to a template, click the learning plan's name (under the left-hand Name column) to go to the page where you can add, edit and remove competencies. It will also show which competencies are not assigned to any course.
Once you have added competencies to the template, you can assign the template to individual students, or to an entire cohort of students as described below.
Navigate to Site administration > Competencies > Learning plan templates. On the row for the template you wish to assign, click the "Edit" icon. A dropdown menu will appear showing: Edit, Duplicate, Create learning plans, Add cohorts to sync, and Delete.
To assign a learning plan to a cohort, click 'Add cohorts to sync'. Search for your desired cohort. After you’ve assigned, a message will appear with the number of learning plans created.
To assign a learning plan to an individual student, click 'Create learning plan'. Search for the student or students that you wish to add.
Assigned learning plans are displayed within a user’s profile. A student can see what has been assigned to them by clicking on the learning plan name. They can see their progress towards completion and also click 'Edit' to request a review of any competency.
Anyone with the capability to manage their own evidence can provide a list of evidence of prior learning. This can be used to demonstrate proficiency for one or more competencies.
To upload evidence of prior learning, access your own learning plans page from your profile and click on the "Evidence of prior learning" link. On the next page, click on the "Add new evidence" button and provide as much detail about the evidence as possible (including files and URLs to verify the evidence). Once the evidence is listed, you can link it to one or more competencies from any of your learning plans. Then you can request that someone reviews your competency to decide if the evidence is sufficient and rate the competency.
The information above is merely an overview of the functionality. As you can see, this is a complicated topic and can be used in many ways. We request that you reach out to us if you have any questions or would like to talk over the possibilities for use on your site.