Enrollment Options
| Site: | Tri-City United Moodle Site |
| Course: | Orientation for Admins - v3.11 |
| Book: | Enrollment Options |
| Printed by: | Guest user |
| Date: | Saturday, September 6, 2025, 7:48 PM |
Description
All links open in a new window.
1. Manual Enrollment
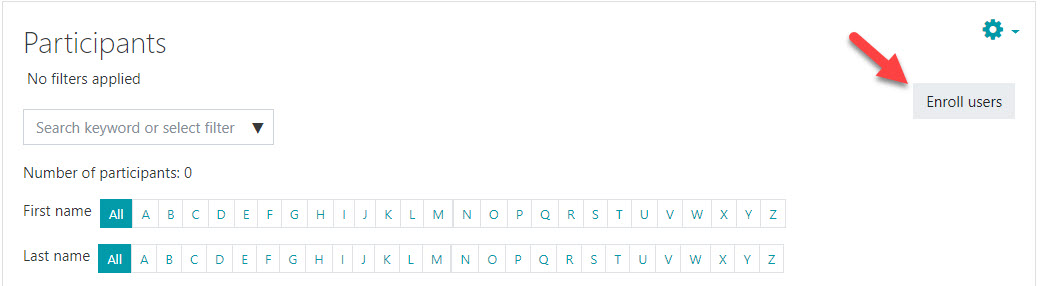
Enroll Users
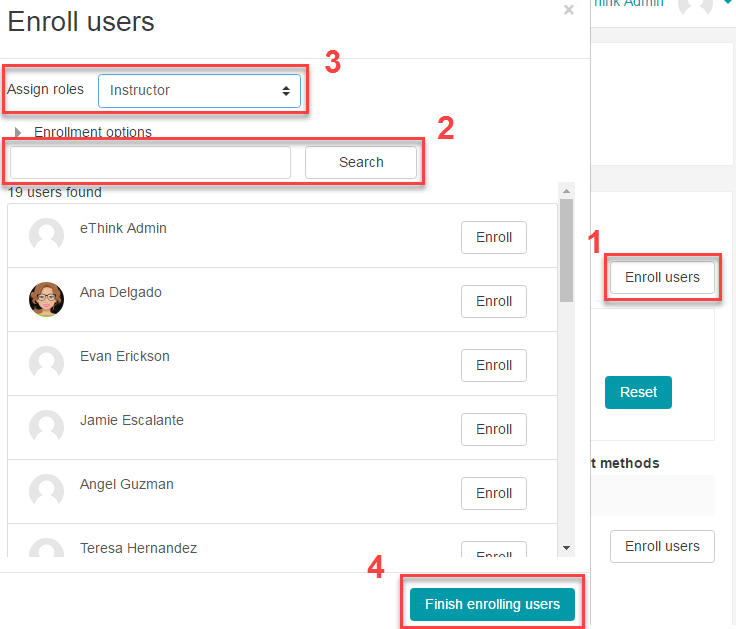
Users can be manually enrolled into a course from the Participants page in a course. First navigate to the Participants link in your Navigation drawer, then click the Enroll Users button.
A popup window will appear. Use this window to search for users to enroll. You can select multiple users with different roles. When all users have been selected, click the "Finish enrolling users" button.
Remove A User
When using the Manual Enrollment method, users can be enrolled, suspended, and removed from a course at any time. If a user is removed from the course, then added back later, you'll have the option to recover their submitted course work. This option is typically enabled by default. You can also make changes to the users' roles.

Admin Tip: Handling Incompletes
If you have a learner who needs additional time to complete a course, but the instructor does not want the course to be available to all learners, we have a special "Incomplete Student" role we can add to your site. This role is configured so you can assign it to students at the course level. Any student with this role can access the course, even when it's hidden from other students.
2. Self Enrollment
The self-enrollment feature allows students to enroll themselves in a course without an administrator or instructor having to manually enroll them. This is an enrollment method, and must be manually added to the course where you'd like to use it. To do this:
- Navigate to the Participants page in the course.
- Click the gear icon in the top-right corner.
- Select "Enrollment Methods".
- If Self Enrollment is listed on the next screen, but is hidden, click the eye icon to Enable this method.
- If Self Enrollment does not appear on the next screen, select it from the "Add method" drop down menu.
- You can modify the settings for Self Enrollment by clicking the gear icon in the Edit column.

If Self Enrollment is enabled for a course, learners can find the course by either searching for it on your site, or by using the direct link to the course (assuming you or an instructor provide it to them).
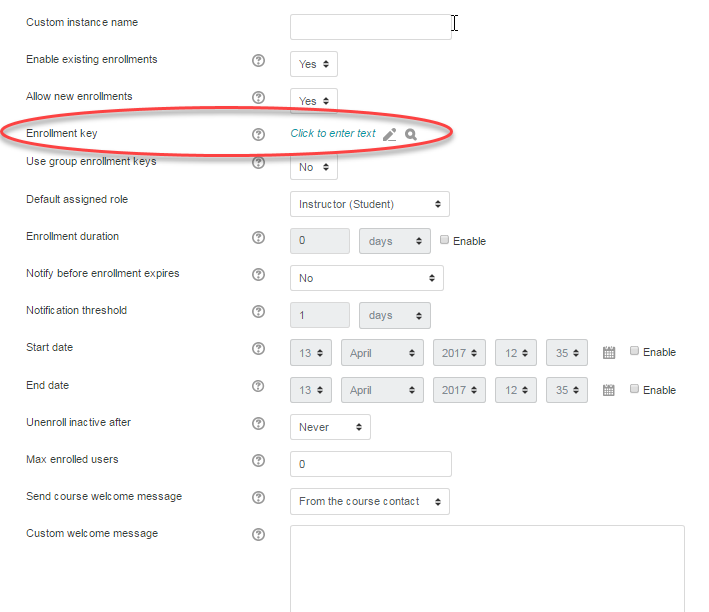
Enrollment Keys
Enrollment keys can be added to courses with self enroll enabled to prevent unwanted users from signing up for the course. To set an enrollment key, return to the enrollment methods page and click on the gear icon to the right of self enrollments (in the Edit column). From here you can configure multiple settings for Self Enrollment, including the instance name, enrollment state date and duration, a welcome message, an enrollment key, and several more options.
The video below will demonstrate how to set up self enrollments within a course, how to use an enrollment key, and what self enrollments will look like for your learners.
3. Cohorts
Cohorts are optional site-wide or category-wide groups primarily used to manage enrollment. For example: If grade level cohorts are created at the system level, those can be used to enroll an entire grade level into a course or series of courses in a single action. Other examples of cohorts that may be helpful are: Staff cohorts based around subject and/or grade level, or cohorts for extra curricular activities.
Setting up a cohort is a two-step process, similar to creating a course and adding enrollments. In this case it requires setting up the cohort, then adding users.
Cohorts can be created:
- manually
- in bulk with a csv file
Users can be added to a cohort:
- manually
- in bulk with a csv file
- with a bulk user action
More information about setting up cohorts, enrolling users in cohorts, or using cohorts for enrollment or bulk user actions is available in the Cohorts documentation.
4. Flat-File Enrollment via CSV
This enrollment tool requires uploading an enrolled.csv file to an SFTP folder provided to you by our admin team. Your site's cron determines the timing for when the enrollments are processed.
Creating The Enrollment File
In this process you'll create a file named “enrolled.csv” that includes drops and adds for teachers and students (and other roles if appropriate). Unlike the files used for the Course and User Upload tools, this file does not (and must not) include a first row of fieldnames. You will simply include the following information for each add or delete (you may have several rows for a single user if they are adding and dropping multiple courses.)
- “add” and “del”
- role - (teacher, student. etc) This must match the role short names in your system.
- user id number - found in the user’s profile settings; usually matches their SIS/ERP or student ID number
- course id number - found in the course settings
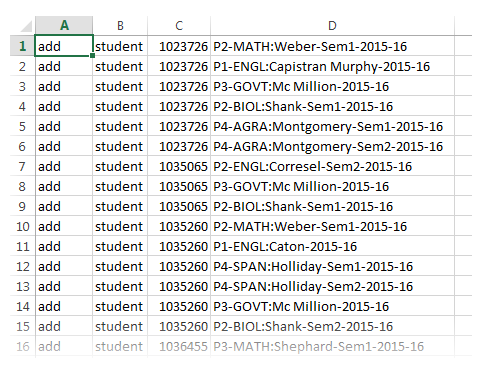
The file used for uploading users should be a text file saved as a .csv with a single record per line.
Encoding matters with your flat-file upload process. The file encoding must be set to UTF8, which can be done using the steps below.
1. Open csv file in NotePad++ or similar text editor.
2. Click on the “Encoding” menu option at the top.
3. Select “Encode in UTF-8”.
4. Save the file. This can also be done in Excel while you're saving the CSV.
You also need to make sure that the file has Linux End of Line Characters:
- Open the file in Notepad++.
- Click on View > Show Symbol > Show End of line.
- There should only be a line feed (LF).
- To fix them, click on Edit > End of line conversion > Unix (LF).
Uploading The File
Flat-file enrollments are picked up and processed via a recurring background job. You will need to upload it to the specific SFTP folder that was provided to you by eThink for it to be processed.
SFTP Upload Process
- Using an FTP client application such as WinSCP, FileZilla, etc., create an SFTP connection in the application using the access information and credentials issued to you by eThink.
- Connect to the SFTP site and upload your enrolled.csv file into the folder specified by eThink.
- When the background job picks up the enrolled.csv file and finishes processing it, the results will be appended to the end of the log file that is stored in the same location on the SFTP site. Please review that log file to confirm your file was successfully processed.
5. The Enrollment "Menu"
Developer and ed tech enthusiast Lewis Carr created a helpful "menu" of enrollment methods, which we've included after this Book.
Carr classifies each method into one of five categories: Starters, Mains, Specials, Signature Dishes, and Desserts. This should provide an idea of each category’s expected usage, how common each is used, and which options are a better fit for custom rather than broad case scenarios. He also adds a “spice notice” next to each item to signal the technical difficulty involved in setting them up (don't worry; only two in the whole menu classify as “advanced").
You'll find the full "menu" saved as a PDF within this course, immediately after this Book. You're welcome to download and save this resource.
While the PDF outlines the menu in a more visual way, the options you'll find there are also outlined below.
Starters
- Manual Enrollments (Core plugin – Available in Moodle by default; Easy)
- Self Enrollments (Core; Easy)
- Guest Access (Core; Easy)
Mains
- Cohort Sync (Core; Easy)
- Category Enrollments (Core; Easy)
- Flat File (Core; Easy)
- Course Meta Link (Core; Easy)
- PayPal (Core; Easy)
- LDAP Enrollment (Core; Moderate)
- External Database (Core; Moderate)
Specials
- MNet Remote Enrollments (Core; Advanced)
- Publish as LTI Tool (Core; Advanced)
- IMS Enterprise File (Core; Moderate)
Signature dishes
- Auto Enroll (Plugin; Easy)
- Enroll By User Profile Field (Plugin; Easy)
- Course Completed Enrollment (Plugin; Easy)
Desserts
- Badge Enrollment (Plugin; Easy)
- Enrollment Upon Approval (Plugin; Easy)
- Auto Enrollment (via activity) (Plugin; Easy)