Creating User Accounts
| Site: | Tri-City United Moodle Site |
| Course: | Orientation for Admins - v3.11 |
| Book: | Creating User Accounts |
| Printed by: | Guest user |
| Date: | Thursday, September 4, 2025, 2:08 AM |
Description
All links open in a new window.
1. Account Creation Considerations
Spending some time making decisions on the initial creation of users, courses and then adding enrollments is an important part of the implementation process. This guide should help you identify necessary information for creating accounts.
To get started, think about answers to the following questions:
- Is the ID number something learners (and staff) know? (Either memorized or on their ID card?)
- Do learners (and instructors) have email addresses you have provided, or are they using usernames or emails they've created for other systems?
- Do you have an instructor list with their email addresses (and ID number)?
2. Manual Account Creation
Add a new user
Users may be manually added on an individual basis. In Site Administration, navigate to Users > Accounts > Add a new user.
The required fields when creating a new user are username, first name, surname, and email address.
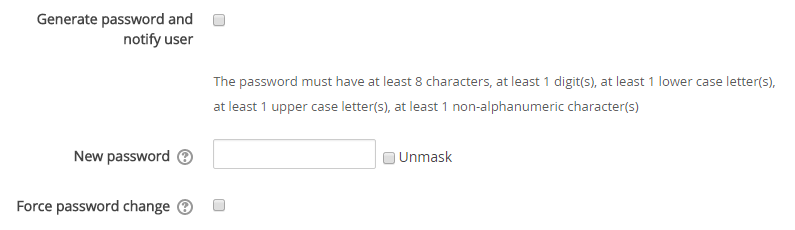
Password creation
Password requirements are set as part of your site's security settings, and can be updated through a support request. We recommend all passwords have at least 12 characters, 1 digit(s), 1 lower case letter(s), 1 upper case letter(s), 1 non-alphanumeric character(s).
When adding a new user you can create a custom password for them or have Moodle automatically generate a password and notify the user via email. There is also the option to force the new user to change their password the first time they login to Moodle.
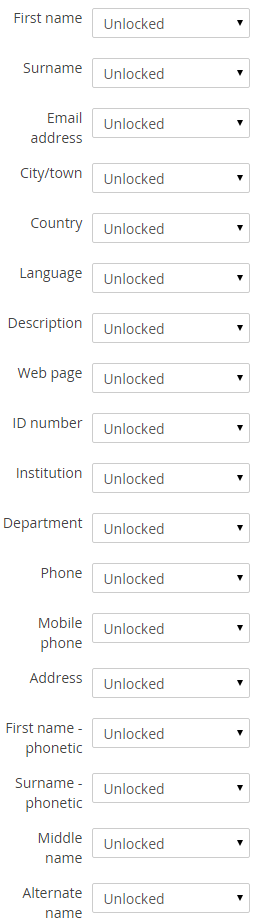
Locking user fields
User data fields can be locked. This is useful for sites where the user data is maintained by the administrators manually by editing user records or uploading using the 'Upload users' facility.
If you are locking fields that are required by Moodle, make sure that you provide that data when creating user accounts or the accounts will be unusable.
Consider setting the lock mode to 'Unlocked if empty' to avoid this problem.
 Your eThink implementation team can assist with the configuration of these settings.
3. Batch Account Creation via CSV file
This tool is only for adding users to your site, and making initial enrollments to courses. It should not be used for making subsequent enrollments into courses. Use extreme caution when using the options to update users; errors updating existing accounts can affect your users badly.
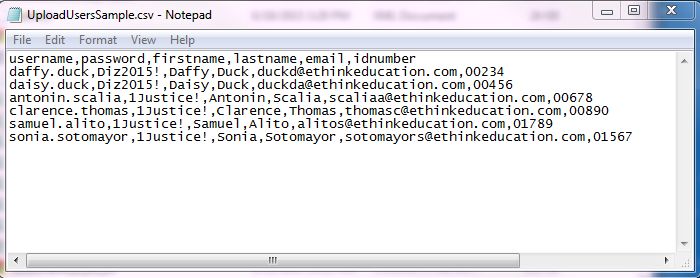
The file used for uploading users should be a text file saved as a .csv with a single record per line. The first record (row 1) contains a list of fieldnames defining the format of the rest of the file.
Required field names are:
- username - the user’s unique username
- password - optional if the default "Create password if needed" setting is used. If
you don’t want to include a password for each user, keep the column in place,
just leave it empty.
- firstname - user’s first name
- lastname - user’s last name
- email - user’s fully qualified email address
Other optional fields could include:
- idnumber - the user’s institutional ID; important if enrollments will be handled by the automated process
- cohort - internal cohort id numbers or non-numeric cohort IDs of existing Cohorts (create the cohorts first before attempting to enrol users)
It will look similar to this:
A Tip For Proper Encoding
Encoding matters with your flat-file upload process. You want to make sure that the file encoding is
set to UTF8, which can be done by following the steps below.
1. Open csv file in NotePad++ or similar editor
2. Click on the “Encoding” menu option at the top
3. Select “Encode in UTF-8”
4. Save the file
You also need to make sure that the file has Linux End of Line Characters. If you need directions on how that is done please review our Knowledge Base article (opens in new window) on Flat File Processes.
3.1. Creating and Enrolling Users in One File
The Upload Users tool also allows for enrollments into course(s) at the point of creation. Six enrollment fields are available for the course information: course, type, role, group, enrolperiod, enrolstatus.
For the first course the fieldnames would be: course1,type1,role1,group1,enrolperiod1,enrolstatus1, and these can be repeated for subsequent courses up to four courses by iterating the value: course2,type2,role2,group2,enrolperiod2,enrolstatus2.
If using these fields, the file would look similar to this:

Once the file is created, go to the Upload Users tool:
Site administration > Users > Upload users
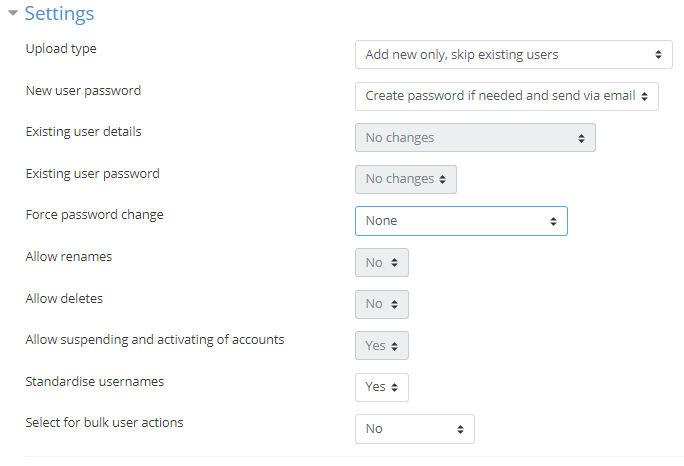
Once the file is added, a preview and Settings will appear. Set “Preview Rows” to the maximum to assure that you can preview the results before uploading.
The “Upload users preview” page will display with the following columns: CSV Line, username, password, firstname, lastname, email, idnumber, status
The “Status” column will display any errors regarding each csv record. If the “Status” column is blank, there are no errors with that csv record.
At the bottom of the preview page are settings for the upload. In the screenshot below are recommended settings for the users upload.
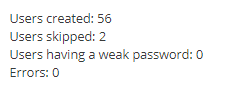
On the “Upload users preview” page, click the “Upload users” button at the bottom of the page. The “Upload users results” page will display. The “Status” column will display information about the creation of the user account. Total results display at the bottom of the page, similar to the screenshot below.
Click the “Continue” button to complete the upload.
The video below is a tutorial on uploading users with a CSV.
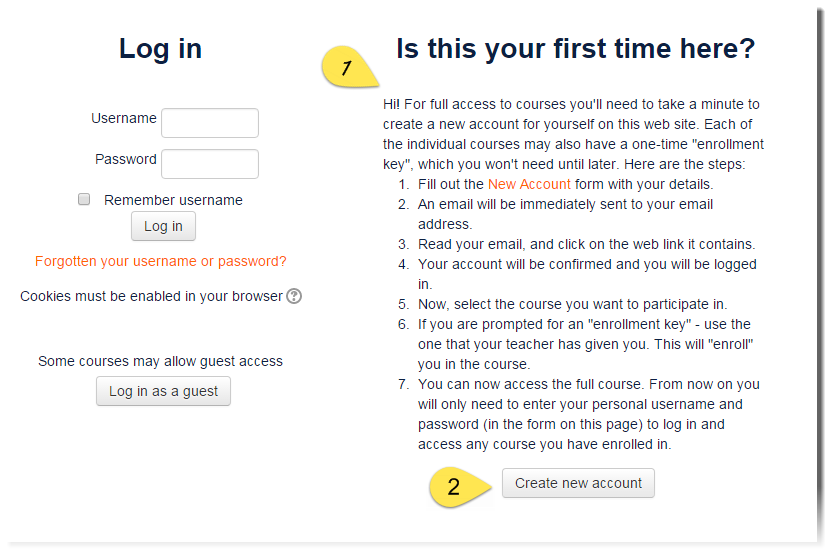
4. Using Self-Service Account Creation
Email-based self-registration allows users to create their own account. If enabled, new users will be prompted to create a new account when they first visit your site's login page. After completing the registration form, an email containing a secure link to confirm a valid address will be sent to the user. The user can use that link to gain access to the site. Once their account is created, it can be manually enrolled in courses (or the user can self-enroll in courses configured to allow self-enrollment).
Unlike other user account creation methods, self-registration does open you up to the possibility of spammers creating accounts in order to use forum posts, blog entries etc. for spam. To minimize this risk, self-registration can be limited by the allowed email domains setting. This is a good option if all prospective users have an email provided from a specific domain. Another option to help limit spam accounts is to enable a reCAPTCHA element on the registration page.
Self-registration does not prevent the use of manual authentication for other users, so it is possible to batch create some accounts and open self-registration for others.
Enabling Email-Based Self-Registration
Enabling email-based self-registration is a two-fold process. The plugin needs to be enabled, and authentication settings need to specify the site should use self-registration. eThink by Open LMS manages this configuration as part of your fully managed implementation and support model.
Other Optional Settings
Limiting To Specific Email Domain(s)
One way to limit who can self-register is to restrict all new email addresses to particular domain(s). For example, if your school or district provides email address to all staff and/or students, use the "Allowed email domains" to permit only self-registration from this domain. (A domain is the part of the email address that comes after the @.) This will assure accounts are created with legitimate school provided email addresses, and will make it easier to identify users with their true identity.
Simply provide your eThink implementation team with the list of domains you wish to allow.
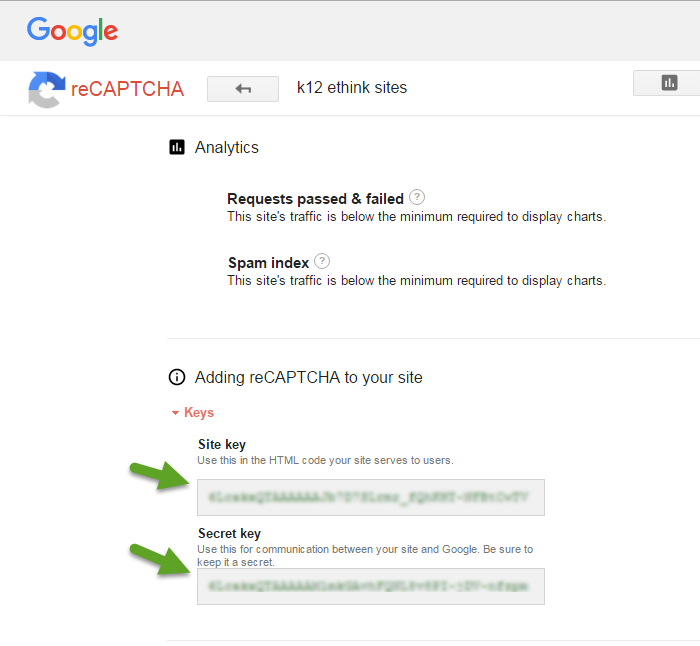
Enable reCAPTCHA
reCAPTCHA adds a visual/audio confirmation form element to the sign-up page users must complete as part of the registration process.

For more about reCAPTCHA or to register your domain, visit Google's ReCAPTCHA site (opens in new window).
After submitting the form, a site key and secret key will be generated. Provide both keys to your implementation team, who will complete the configuration for you.
Customizing Instructions On The Login Screen
The text users see on your login screen below the "Is this your first time here?" header can be customized. Just provide the desired text to your implementation team.
5. Integrating Your Site with Active Directory
LDAP or LDAPS is the most common authentication integration among eThink by Open LMS clients. Other external authentication integration methods available include:
- CAS
- SAML (ADFS/Okta/etc)
- oAuth2 (Google, Microsoft o365, Facebook, etc)
Active Directory, or AD, allows your user’s passwords to be verified off of the Microsoft/Azure AD, and if the password is verified, the user is then logged in to your site. This relies mainly on the presence of the user ID number from your Student Information System.
Active Directory Setup
Mapping between the two systems is done using Organizational Units (OU's), which are used to organize the Active Directory user groups. In educational contexts it's common to have a faculty OU, as well as one or more student OU's. The specific containers to be used in your site will be set up during the implementation process, but can also be configured later.
User Creation Process
Similar to the enrollment integration, new user accounts created in Active Directory will be automatically created on your site using one of two processes:
1) As soon as an account in created in AD, a user can login to your site. This will automatically create their account here if it doesn't already exist. This is also called "login sync".
2) A complete synchronization process runs every night. All accounts added to AD or updated in AD are created or updated in your site as well. All users can login to your site using their AD username and password. Do note that all password changes must be done directly in Active Directory; those changes will be immediately reflected here as well.
Expired Passwords and password expiration time lines are enforced by your site. Users will receive a warning when their password is expiring, and prevent users with expired passwords from signing in.
Importance of the 'ID number' field
The Student or Faculty ID number, which is typically stored in the Employee ID field in AD is very important. This populates into the user profile in the ID Number field, found in the Optional section toward the bottom of a user's profile page. This ID number connects the user's account on your site to the user’s SIS information. It is essential that this be present in order for the Enrollment Integration to function properly.
For more information about the Active Directory integration, please open a support request (opens in new tab) through the Open LMS support portal.