More about the Lesson Activity
| Site: | Tri-City United Moodle Site |
| Course: | Moodle™ Basics - v3.11 |
| Book: | More about the Lesson Activity |
| Printed by: | Guest user |
| Date: | Sunday, September 7, 2025, 3:38 PM |
Description
The lesson module is one of the more advanced activities to set up, but it is commonly used and has incredible benefits for organizing your instructional content so we go into further detail on it here.
1. Using the Lesson Module
The Lesson activity is a structured, step-by-step activity that's typically built around presenting content to your learners, and prompting them to respond to checks for understanding along the way. Though the Lesson can present content to learners in a linear path, you can also add branching paths based on the choices your learners make. These branching paths make Lesson an excellent option for scenario-based activities where you're using a "choose your own adventure" style of decision making. You navigated through a Lesson in the Your Course Structure activity earlier in this course. Depending on how you structure your lesson, you can offer more (or fewer) opportunities for review and/or assessments. These options are one reason many instructors use the Lesson activity. However, Lesson can be challenging to learn to build. This book will cover the different steps in building a Lesson.
2. What is the Lesson Activity?
The Lesson activity presents a series of pages to your learners, who are sometimes asked to make a selection before moving ahead. In its simplest form a Lesson can contain just content, and the learners progress through each page in order. A more advanced approach can include both content pages, as well as question pages that check for understanding. As your skills improve you can begin incorporating clusters between your content and question pages. How complex a Lesson is built on your level of experience and comfort building it, and your goals for both the content and the learners.
The primary difference between a Lesson and other activity types is the lesson’s adaptive ability. With this tool, each choice the learners make can show different instructor feedback based on whether it was correct or incorrect, and send the learner to a different page in the Lesson. With planning, the Lesson module can customize the presentation of content and questions to each learner with no further action required by you as the instructor.
You will need to have a clear idea beforehand of how you want your Lesson to progress. Here are some helpful questions to ask yourself:
- Will the Lesson be a graded, linear learning experience?
- Or an ungraded, non-linear practice session?
- Will students be able to go back and revisit areas or is it just a once-only opportunity?
- Will you be including a pool of questions to pull from randomly?
3. Types of Pages in a Lesson
A helpful starting point is the types of pages you have available to you in the Lesson activity. Use these to begin envisioning how you’d like to lay out your Lesson.
Content Page
Content pages are, unsurprisingly, for content. Like other content areas, like the Page resource, or pages in a Book, content pages are for media-rich text for learners. This can include links, images, video, and audio, along with your text.
Question Page
Question pages are great opportunities to check for understanding. You can insert a question page immediately after a content page, or after a few pages of content. You can also set different outcomes if a student answers correctly or incorrectly, including displaying different feedback, and taking the learners to different pages in the Lesson. This is an example of the flow control that is possible in Lesson, and why planning beforehand is important.
Note: Though question types in the Lesson activity are similar to the Quiz activity, these questions will not be saved in the course Question Bank and will only exist within the Lesson.
Cluster
A cluster is a group of question pages which will be offered randomly to a student as they work through the lesson. In more practical terms: In a cluster you'd create a number of questions, then specify how many of those questions should be displayed to your learners. This provides a slightly different experience to each learner, and reduces the likelihood they will see the exact same questions. Clusters are to be considered an advanced use of the lesson module, but are still an attainable skill.
4. How to Build a Lesson - Appropriate Settings
Instructions for building a Lesson depend on how you intend to use it, and what types of pages you're including. The instructions below focus on the top-level settings for Lesson, and do not include any advanced settings nested under a "Show more" link. As a tip: Clicking the ? ("help with") icon next to a setting will show a pop-over explanation of how that setting works.
Begin by turning editing on in your course, then clicking the "Add an activity or resource" link to open the Activity Chooser. Select Lesson.
There are many settings on the next page, but we're going to focus on just five sections:
- General
- Appearance
- Availability
- Flow Control
- Grade
General
The only required field in this section is the name of your Lesson, but we recommend also including a description.
Appearance
Here you'll select if you want to display a progress bar to indicate to learners how far along they are in the Lesson, and if they should see a navigation menu of all Lesson pages (similar to the table of contents in the Book resource).
Availability
These settings control when the Lesson becomes available to learners, as well as their deadline. You can also set an optional time limit.
Flow Control
In this section you'll determine if learners will be allowed to review the entire Lesson after they complete it, whether or not they can re-attempt an incorrect question, and how many times they can re-attempt a question.
Grade
The first three grade settings mirror other activities, and will prompt you for a maximum grade value, a grade category (if you've set up categories in your gradebook), and an optional grade to pass. The grade to pass will affect how grades are displayed to you in the gradebook, as well as how activity and course completion are triggered.
The grade section also includes two Lesson-specific settings. If you designate this as a practice Lesson it won't appear in the gradebook (though attempts will still be recorded within the Lesson itself). You can also specify if the students should be allowed to re-take the Lesson, though there is not a limit on the number of times the Lesson can be re-attempted.
Other Settings
As we mentioned earlier, there are more advanced settings present on this page. For most Lessons you will only need to review the basic settings that were outlined on this page.
5. How to Build a Lesson - Content Pages
Now that you’ve selected the appropriate settings to configure your Lesson environment, it's time to move on to building its content. The three primary options are content, questions, and clusters. Of the three, we recommend beginning with a content page. Once you add a content page you’ll be presented with the opportunity to name the page, add your content, and then tell the Lesson what to do once the student has reviewed all of the content on the page.
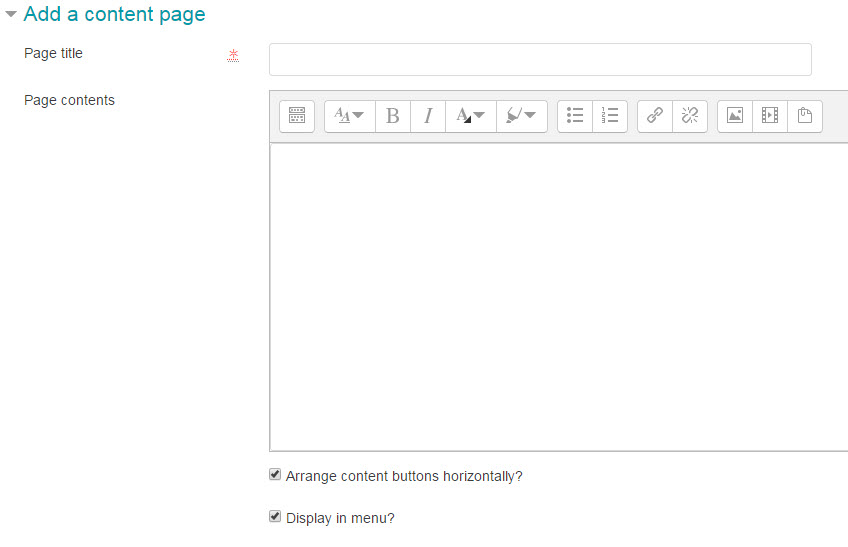

As we mentioned previously, you can make use of the text editor within the page contents space to incorporate images, audio and video, as well as hyperlinks and informative text. At the bottom of the page you'll see four content options (you can change this value in the Appearance section of the Lesson settings). You do not have to use each content option, and can just use the first one if your Lesson is linear. Each content option also comes with a "Jump", which is simply the page the learners are taken to if they select that response.
If you're building a linear lesson, you only need to update Content 1's description and set the jump to "Next page" if it doesn't default to that option. If you're building an interactive (branching) Lesson, you'll use additional content options to set different choices and jumps.
Example: You use the content page to outline a case study of a patient presenting with several specific symptoms. You edit the three of the content options at the bottom of the page with descriptions of different protocols, and specify different pages the learners will be taken to if they select that protocol.
6. How to Build a Lesson - Question Pages
Question pages are an opportunity for you to pose a single question to your students as a check for understanding. If you want your learners to answer multiple questions, you'll create multiple question pages in series (or in a cluster if you're presenting them randomly).
The question types available are essay, matching, multiple choice, numerical, short answer, and true/ false.

The question type you select will determine the exact display options that you have presented to you as you begin to build your question, but the general approach is the same. If you've already used the Quiz activity, this will feel very familiar.
The page content section is where you’ll format the question itself. Any information relevant to the question should go here. The next section is for responses, and includes jumps like you see on content pages. Like the jumps on the content pages, these jumps can be used to decide where the Lesson will take your learners if they answer correctly or incorrectly.
7. How to Build a Lesson - Clusters
Clusters are essentially a group of pages in your lesson, usually questions. A cluster typically contains question pages which are presented randomly to each student who does the lesson. If you want your learners to see each question page in the same order, then you don't need clusters. Clusters are useful in two specific cases:
- You want to shuffle the order questions are presented to your learners.
- You want to randomly pull X number of Y questions (e.g. each learner answers 5 of 10 questions the Lesson randomly selects)
Adding a Cluster
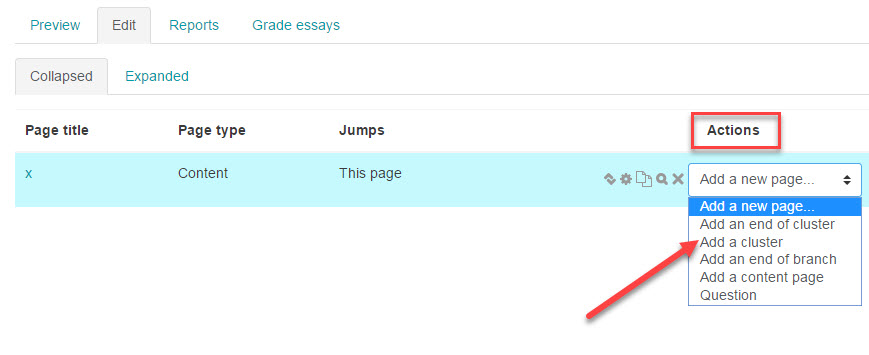
Before you can add a cluster, you need a content page(s) with the information you want your students to learn. On the Edit tab in the lesson, use the drop-down Actions menu for the content page and select "Add a cluster".
Add your questions to the Lesson after the cluster. Set all jumps for each question page to "cluster". After your questions are added, return to the Edit tab in the Lesson, click the drop-down Actions menu for the last question in your cluster, and select "Add an end of cluster".

If you want learners to go straight to the end of the lesson after doing the questions, you can make the end of cluster page jump to 'End of lesson'. If you prefer to have a conclusion page (or more pages), then create another content page. We recommend naming the description of the end of cluster page jump to this page's name rather than 'next page'.
Note: If you'd like to fully preview a Lesson that's using a cluster (or clusters), you'll need to log in with an actual learner account. Previewing with the instructor role or switching to a student role will not display it properly.
The last chapter of this book will outline a few ideas for how you can use Lesson within your course.
8. Ideas for Using Lesson
Generally speaking, because of its "branching" nature the Lesson activity lends itself to a wide variety of activities. Not all of them need to be graded.
Here are additional ideas for using the Lesson activity in your course:
- Use the Lesson to introduce a new topic. The learner can progress at their own pace, reviewing what they are not sure of and moving on when they feel ready.
- When using the Lesson to introduce a new topic, offer pages that deliver the content in different mediums and allow students to select a preference. For example, the button "Do you prefer to read?" goes to a page of text; "Do you prefer to watch a video?" goes to a screencast; "Do you prefer to listen to instructions?" goes to a podcast and so on.
- Use the Lesson to set up situations where the learner has to make a choice each time, and the scenario changes according to their selection. This could be a medical emergency (for example, deciding upon the correct treatment), or a customer relations exercise ( learning how best to deal with an aggressive client). Lesson can also work well for exploring moral and ethical issues.
- The Lesson can be used to create a "choose your own adventure" type of experience where the learner reads a page (or watches a video/listens to an audio file), then decides their "character's" next move. This could be used in an HR training to help guide employees to behave responsibly by taking decisions for a character who is in a potentially problematic situation.
- Learners can be taken to different sets of revision questions according to their answers, allowing them to progress from basic to intermediate to advanced according to their demonstrated prior knowledge.